
Teardrop campers are a great way to get out and explore the world. They are also a great way to save money on camping trips. You can build your own teardrop camper with just a few simple tools and some basic carpentry skills.
This article will show you how to build a teardrop camper in an easy step-by-step guide.
Here’s a rundown of how to build a teardrop camper trailer quickly;
- Create the floor plan — your floor plan should be between 4’x8′ or a 4’x10′ dimension
- Build the teardrop trailer base — get a trailer frame base with good wheel bearings for setting the remaining parts of the trailer
- Construct the walls — put the walls together, so it’s easy to install wiring, doors, and windows
- The galley — install the cabinets, water tanks, and shelves to build out your galley kitchen
- Set up the roof — install the roof and use a hardboard as support
- The wiring — get a battery and a fuse panel and connect your red power wires.
- Build the rear door — to build out the rear door, use some pieces of plywood and hardwood
- Insulate your teardrop trailer — for insulation, use one-half-inch thick sheets
Table of Contents
- 1 What is a teardrop camper trailer?
- 2 How to build your own teardrop trailer
- 3 Teardrop camper trailer plans
- 4 How to build a DIY teardrop trailer in an easy step-by-step guide
- 4.1 Step 1: Creating the floor plan
- 4.2 Step 2: Building the teardrop trailer base
- 4.3 Step 3: Constructing the walls
- 4.4 Step 4: The galley
- 4.5 Step 5: Setting up the roof
- 4.6 Step 6: Installing the vent
- 4.7 Step 7: Wiring the teardrop camper trailer
- 4.8 Step 8: Building the rear door of your teardrop camper trailer
- 4.9 Step 9: Insulating your DIY teardrop camper trailer
- 4.10 Step 10: Alterations and modifications
- 5 DIY teardrop trailer cost for a simple 4 by 8 camper trailer
- 6 Final Words
- 7 Frequently Asked Question
What is a teardrop camper trailer?
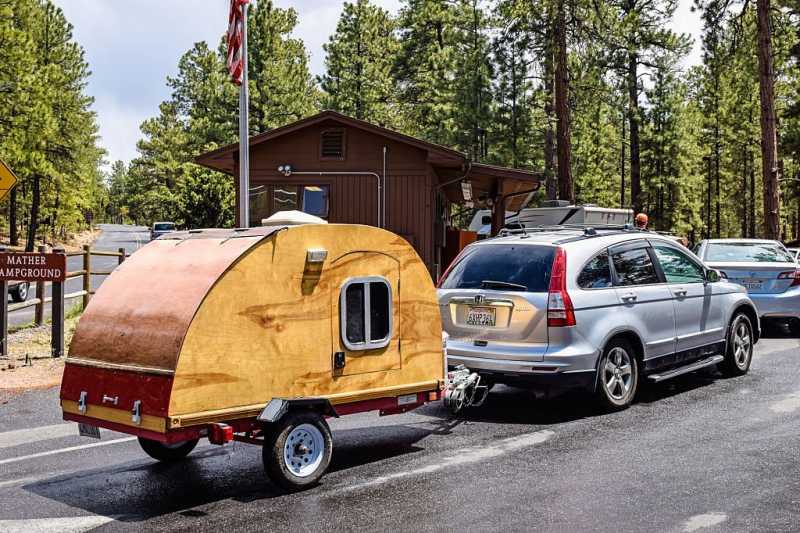
A teardrop camper is a small, lightweight trailer that is popular for traveling in remote areas. It is a traditional camper that has been adapted to be smaller and lighter, making it easier to transport.
The teardrop camper trailer resembles a small RV and can be used for camping or travel. It is easy to set up and take down, making it perfect for short trips or overnight adventures.
How to build your own teardrop trailer
Full-size campers, particularly travel trailers, are no longer ideal for camping. First, they’re super difficult to tow because they weigh more than 4000lbs. And in addition, they are insanely expensive.
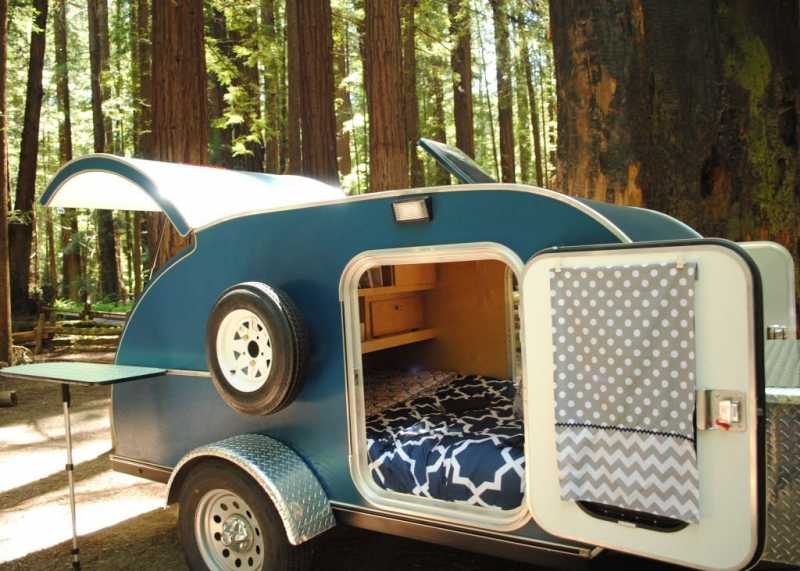
Fortunately, a teardrop trailer offers you everything you need to make your camping experience worthwhile. The best part? They are lightweight, easy to tow, customizable, and, more importantly, cost-effective.
However, their most basic will have a kitchen, dining area, bathroom, and bedroom that can accommodate two adults.
Their streamlined design makes them super easy to pull by smaller vehicles — cars, motorcycles, SUVs, and family trucks.
Depending on the features and upgrades you want; length, height, weight, and accessories, a teardrop camper trailer can cost between $2,000 to $3,000 for teardrop trailers with fewer amenities and can go as high as $10,000 to $15,000 for teardrop trailers with enough utility, storage, and sleeping space.
Nevertheless, buying a motorhome can cost anywhere from $10,000 to $40,000 on average and $40,000 to $300,000 based on the upgrades, style, and features of the motorhome. Nevertheless, building your own teardrop camper trailer from scratch will save you money.
Soon, we will come to how you can build your own teardrop trailer from scratch, but before that, consider the following teardrop trailer plans.
Teardrop camper trailer plans
The teardrop camper trailer plans come in different sizes. Some are most suitable for individual use, while others will be most convenient for family camping trips.
Here are some of the best teardrop trailer plans you can find and use for your DIY teardrop camper trailer project.
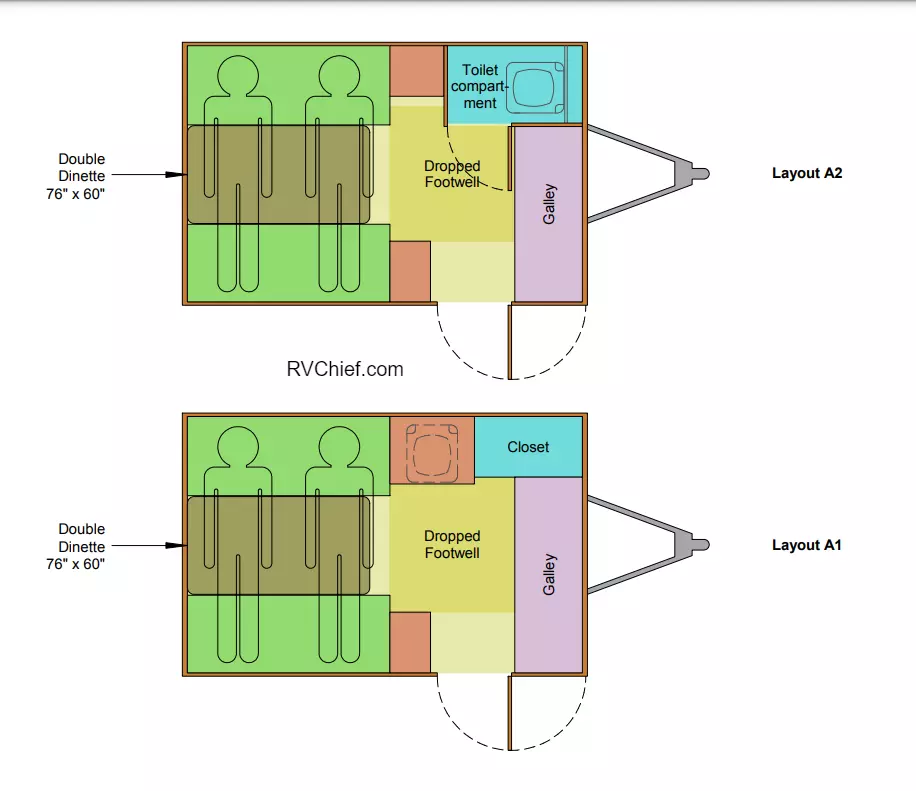
4×8 teardrop camper trailer plans
The 4×8 teardrop trailer plans are usually 4ft wide and 8ft long. Most people prefer this camper plan for many reasons, especially because it can comfortably carry a whole family. You can also customize it to suit your needs.
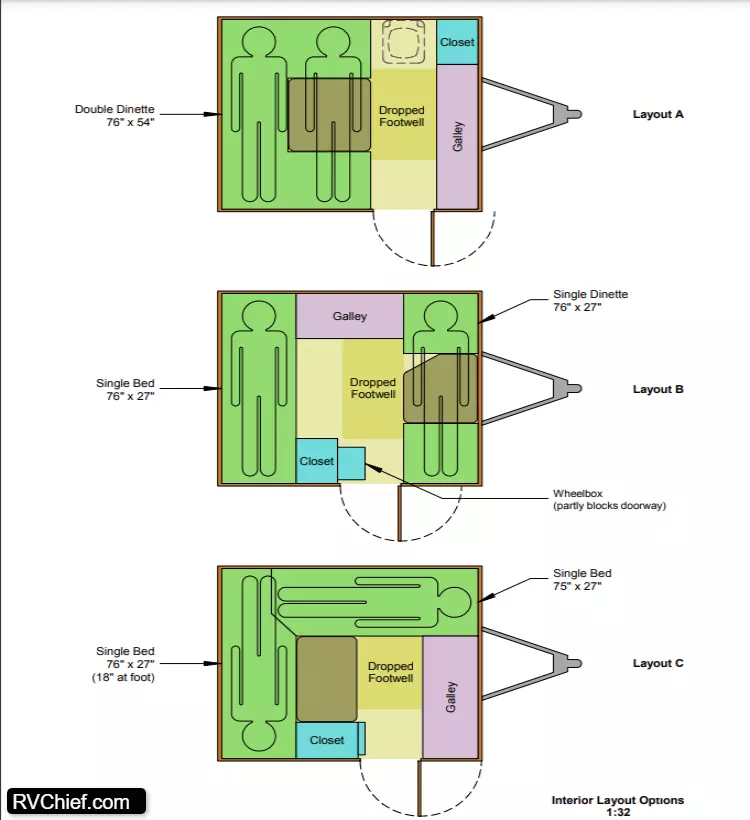
A distinct toilet compartment can be crammed into this design in place of the closet, but it only has 54″ headroom inside. If you prefer to build your teardrop trailer using this camper plan, it’ll help you cut down the costs.
The 4×8 teardrop trailer design equips just about standing headroom in the dropped footwell, which can hide how little this trailer truly is. So let’s be clear:
- Only one person can stand up at a time.
- You can’t lift your arms without hitting something.
- You cannot get in/out of the camper trailer without sloping.
However, any other trailer plan larger than 4×8 will be more expensive. This teardrop trailer plan is the least on the list.
The major difference between the 4×8 and 5×8 trailer plans is that the latter can be easily assembled and has an extra foot that gives it more space.
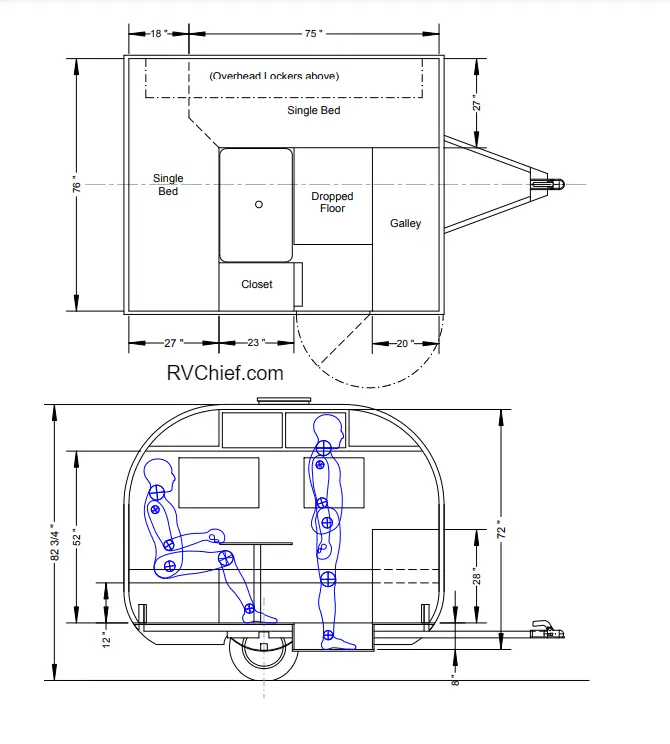
4×10 teardrop camper trailer plans
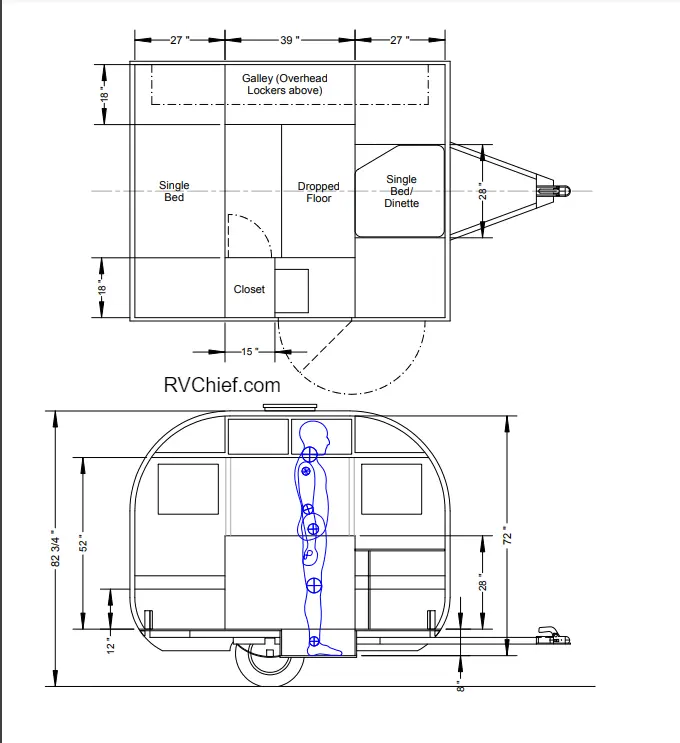
This teardrop trailer plans are compact and quite similar to the 4×8 plan but with everything expanded into a spacious arrangement, with a 60″ wide dinette area. They are perfect for individuals or couples looking to try out short camping trips.
So whether you get a 4×10 DIY trailer or buy it from the market, you’ll still get the best experience.
The body is just wide enough to allow beds to be set across the trailer’s width, allowing many different layouts to be used like a storage compartment, kitchen area, bathroom, ceiling fan, and many other facilities.
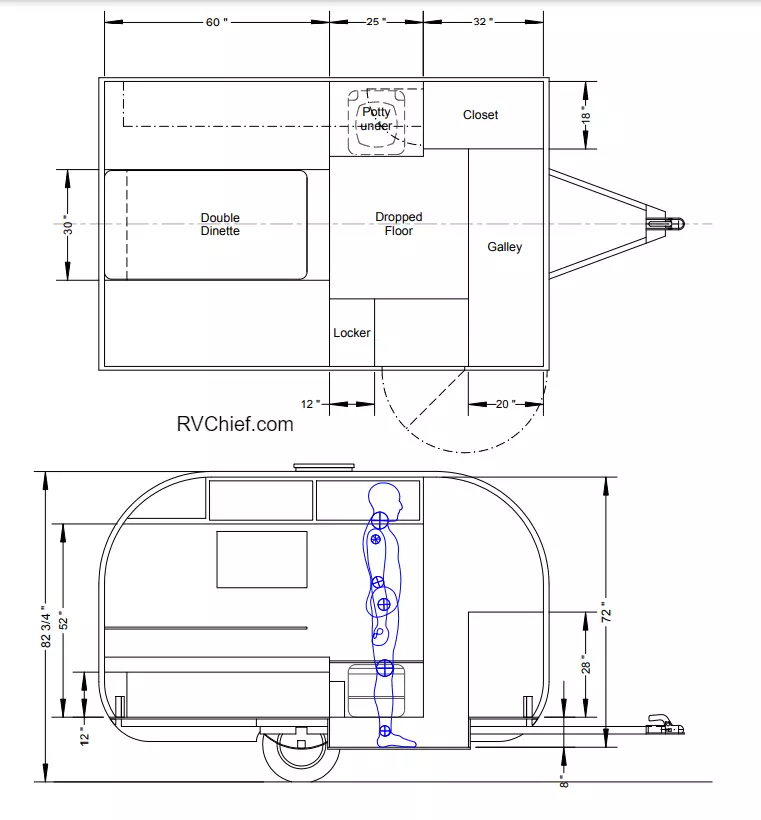
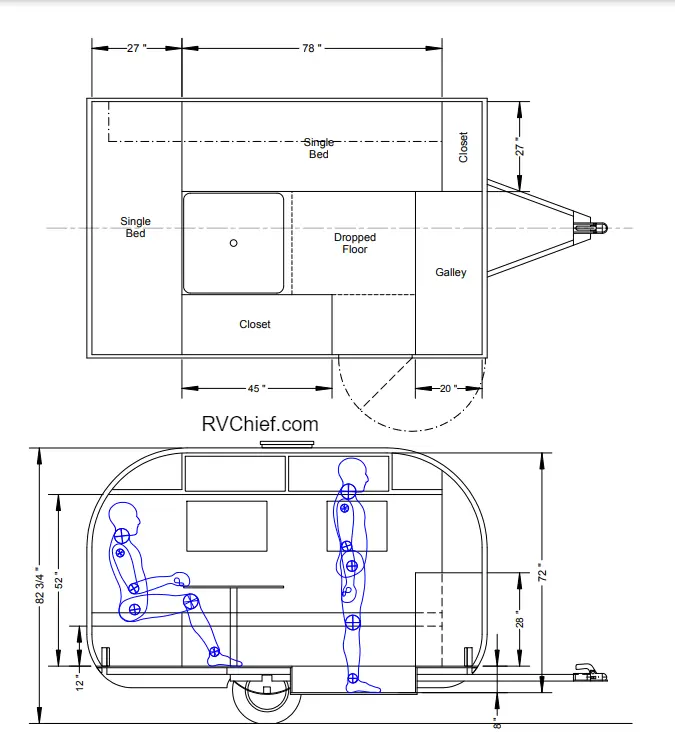
This trailer design is planned as the most extensive camper body that can be safely mounted on a Harbor Freight 4×8 utility camper trailer kit. With this trailer plan, you’re sure to experience comfort and fun throughout your camping trip.
However, keep in mind that this trailer is heavier than the 4×8.
5×8 teardrop camper trailer plans
These plans involve following detailed instructions to build a teardrop using one of the Northern Tools Utility Trailers. One of the top features of this plan is that it can fit a queen-size bed that weighs between 575 to 650 lbs.
Interestingly, you can build one for yourself at less than $2000. The 5×8 teardrop camper trailer plans are the perfect trailers for solo campers. They are suitable for road use and can be used for long-distance trips.
5×10 teardrop camper trailer plans

The 5×10 teardrop camper trailer plans have more space (room), good balance, and don’t sway or bounce. They are safe for road usage, and you can customize any trailer part to suit your taste.
The fuel mileage of this trailer is reliable. Plus, it is lightweight and can be towed behind your Honda Civic.

These teardrop trailer plans are larger than the 5×8 and thus have extra features that can accommodate other family members for a weekend getaway trip.
6×10 teardrop camper trailer plans
The 6×10 teardrop trailer plans are perfect for solo campers and couples looking to try weekend camping trips. They are compact and offer loads of facilities.
6×10 teardrop trailer plans are typically six feet wide by ten feet long. They comprise a double bed space, overhead cabinet storage, a ceiling fan, a suspended desk system, a bathroom, and a kitchen area.
This trailer plan can also accommodate a wardrobe if you choose to have one.
6×12 teardrop trailer plans
The 6×12 teardrop trailer plans are more suitable for families. They are usually six feet wide and twelve feet long.
They can be customized into a double-size family camper with sideways bunks. For storage, an overhead cabinet or under the bunk cabinet can work.
However, it’s important to note that this trailer plan could be heavier than a 6×10 plan but offers more leeway. You can customize it to fit your needs.
How to build a DIY teardrop trailer in an easy step-by-step guide
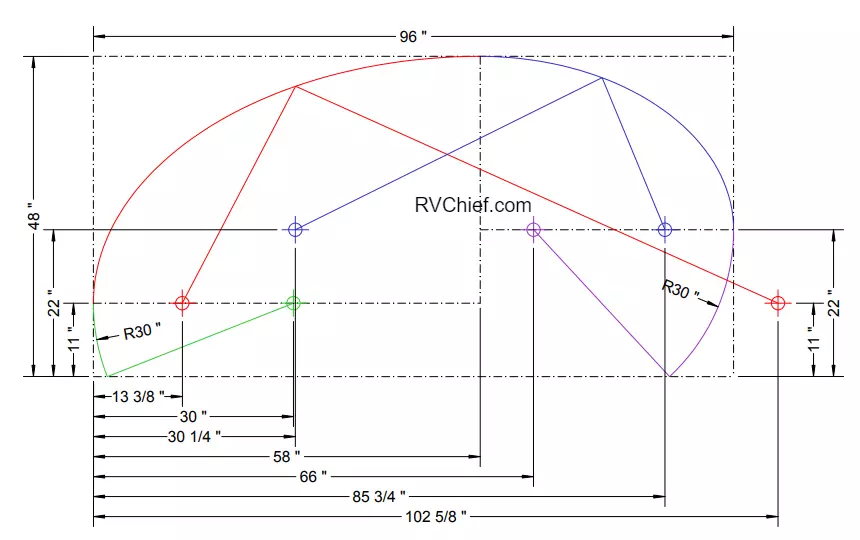
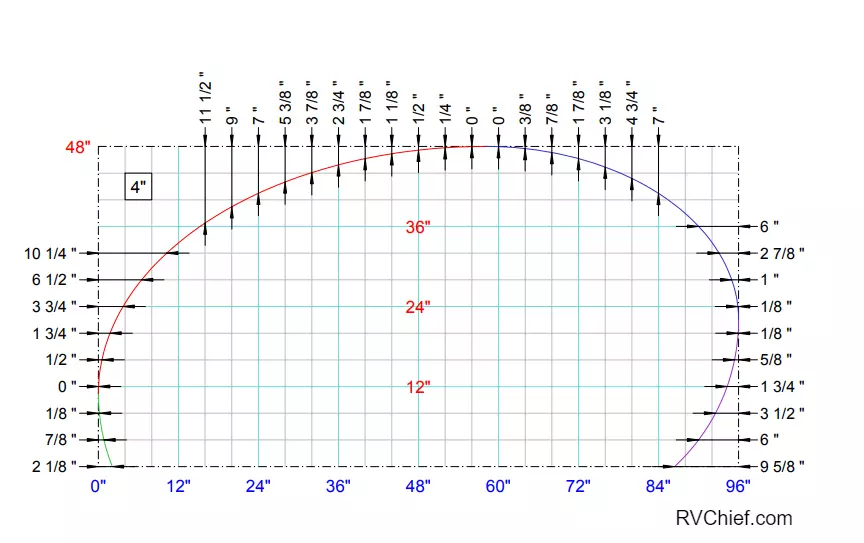
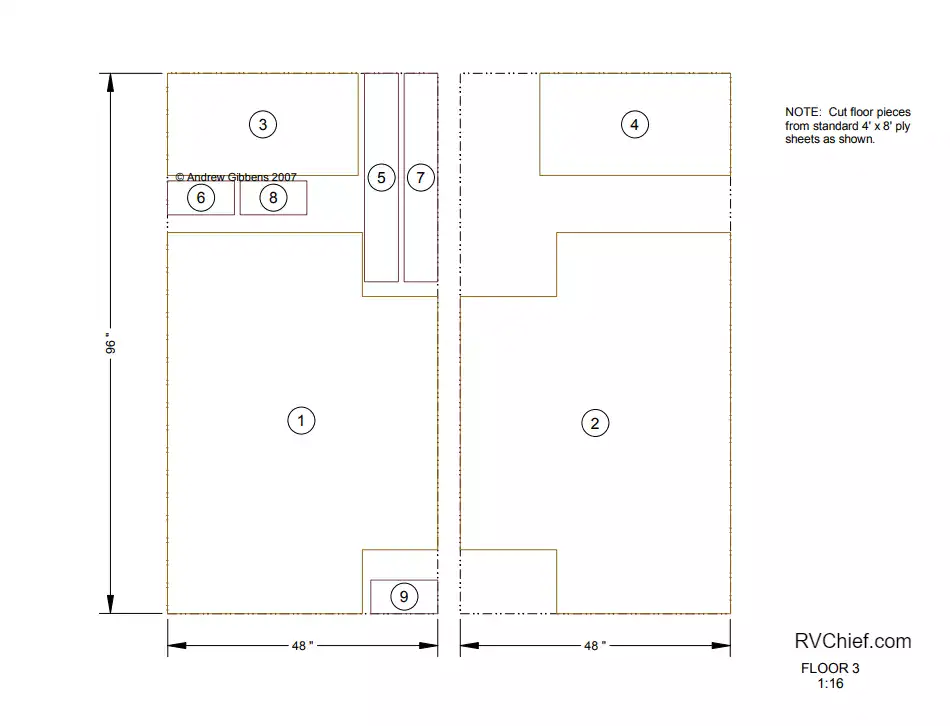
Step 1: Creating the floor plan
First, before you create the floor plan, consider how long you want the teardrop trailer to last and how much load you want to carry.
Ideally, a 4×8 or 4×10 floor plan will work fine for you. And the longer the trailer base, the better the space for a storage cabin.
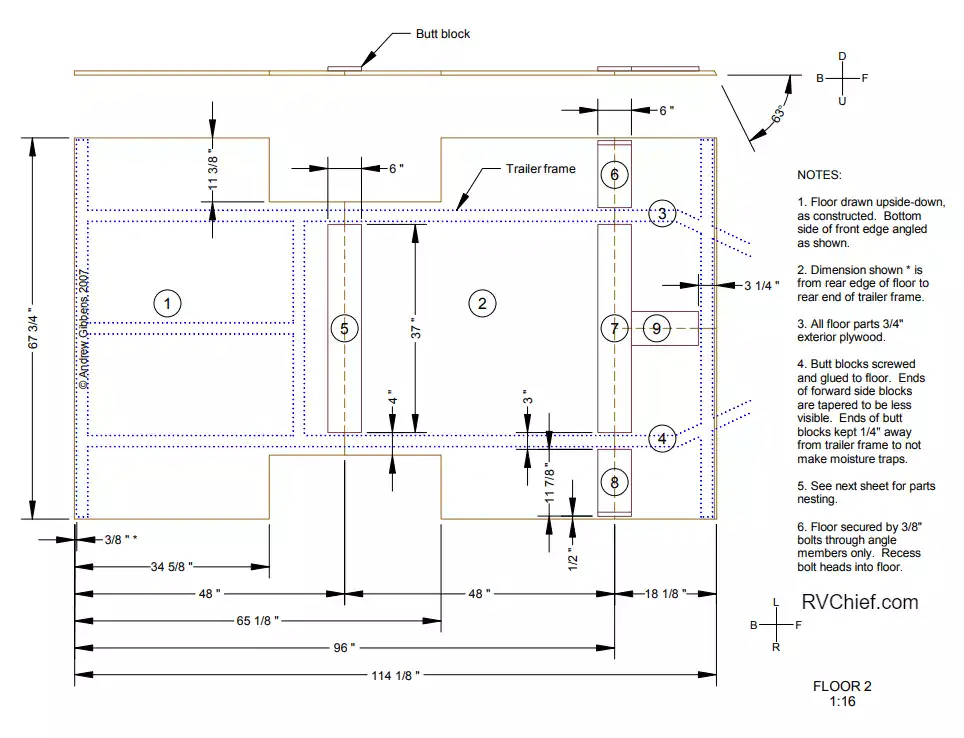
Once you’ve figured out your ideal floor plan, get to work by assembling them from scratch. Make sure to purchase all the required assembling tools for easier fabrication.
Alternatively, you can order a firsthand trailer. But, that might cost you thousands of dollars, including shipping charges. Thus, getting a used trailer is ideal and saves you money.
Before purchasing a pre-owned trailer, here’s a rule of thumb: examine the entire trailer in detail, ensuring the wheel bearings are in good shape with no traces of rust.
If the trailer is in poor order, your best bet would be to assemble it from scratch. The next step is to build the base for the teardrop camper.
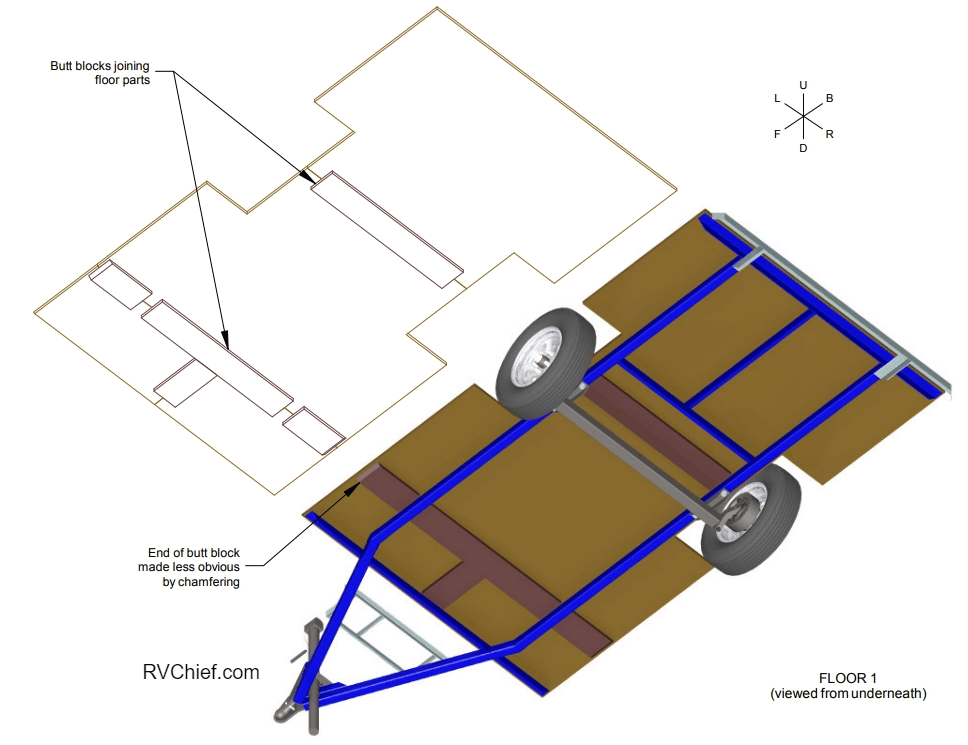
Step 2: Building the teardrop trailer base
Done creating your floor plan; now it’s time to build the teardrop trailer base. Working on the base should come with utmost care and attention, as any mistakes could cause poor insulation.
Meanwhile, prepare your tools before you start building; drill bits, hammers, nails, screws, and pieces of plywood. Ensure your plywood perfectly fits the 4×8 floor plan. Screw your 1⁄2 plywoods to the trailer base using nuts.
With an undercoat, turn your trailer and dye to protect its elements.
Add additional framing using 2’x4’s and secure properly to the rear and front of the trailer. Add some styrofoam insulation to help pull the frame tightly to the trailer base.
Now you have enough support for your 1⁄2 plywood upon which other fragments of the trailer will sit. The next step is to construct the walls for the teardrop camper.
Step 3: Constructing the walls
Before you construct the walls, set the base for installation. To prepare your base, use a combination of the groove and tongue method and glue.
You’ll also need pieces of 4×8 plywood to help enhance the shape of the teardrop trailer and reduce its weight.
On your walls, drill holes for wiring. Get your pieces of plywood and cut them to secure your floor plan. Remember to make spaces for fixing the door and windows.
For other exterior and interior fixtures, use the same approach for drilling holes.
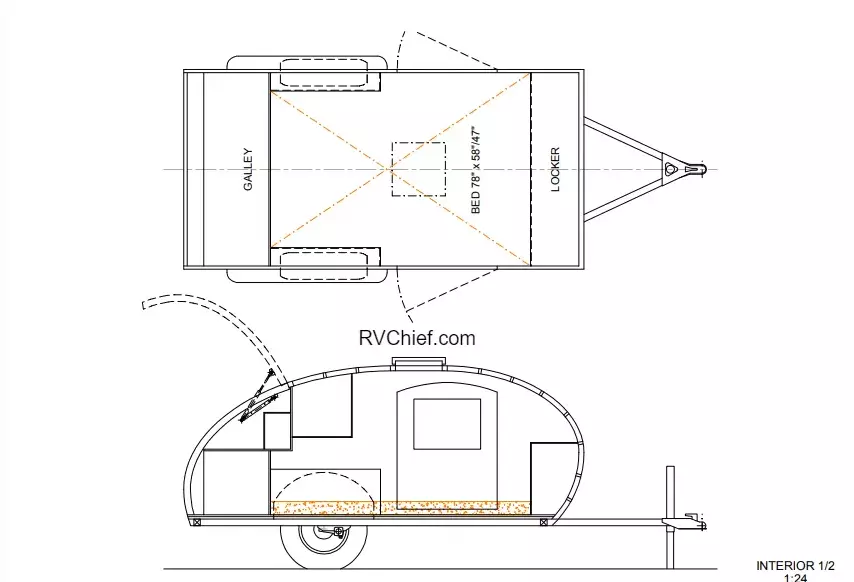
Step 4: The galley
Your kitchen galley should start from the rear of the teardrop trailer. Ideally, it’s best to first construct your cabinets differently before installing.
Once you’re done with the construction, clamp with deck screws using a glued set.
Other parts of the galley can then follow suit. The water tank installation should come next.
Also, remember to create an area for the propane stove, a few drawers, and storage space for cooking utensils and ingredients.
Step 5: Setting up the roof
You’ll need to construct a fastening to serve as support to the wall for the roof. Preferably, a 2ft 2×2 piece of plywood will do.
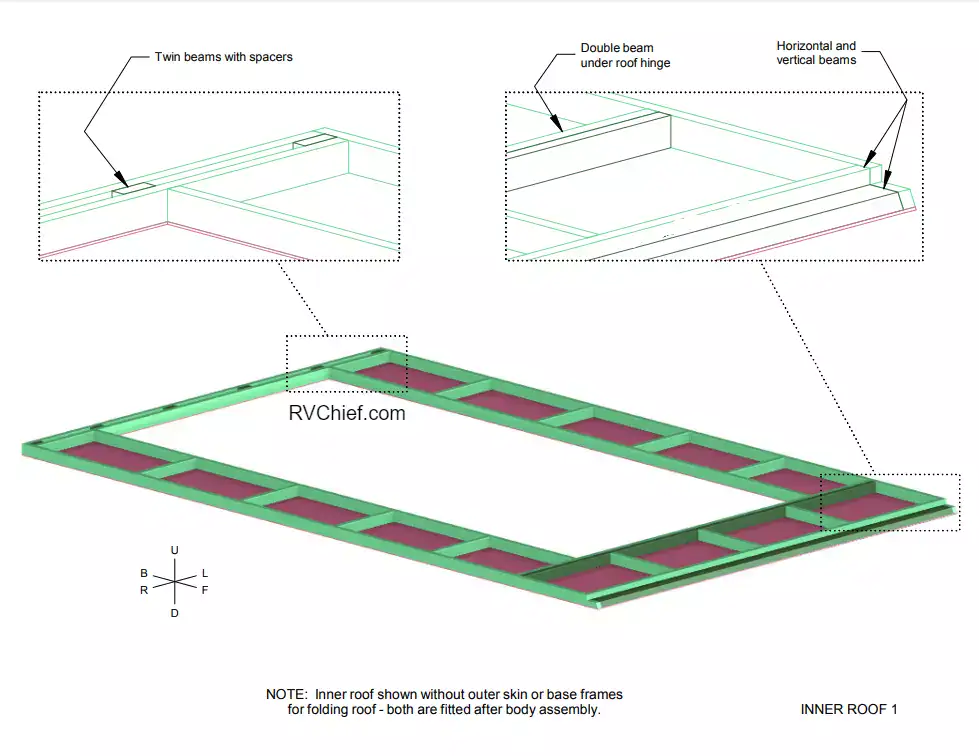
To properly secure the plywood, get an additional 46 1⁄2 inches hardwood with 1⁄8 inches thickness. Please make your way into the trailer and gradually slide the hardwood into the two walls, ensuring it gets closely lined with the braces.
Next, flush your hardboard from top to bottom and use screws to secure it. Use a seal to secure areas where your hardwood is attached to the floor and the braces, particularly a white caulking fastener.
Finally, ensure to insulate properly before securing your wall’s interior and exterior sides. The next step is to install the vent for the teardrop camper.
Step 6: Installing the vent
To install the vent, start first by measuring the vent opening. Cut an opening through the roof studs using a standard opening unit of 14 – 1⁄4 x 14 -1⁄4 inches.
Remember never to measure an opening from the trailer’s exterior, which can make your job difficult. Always cut and measure from the interior for accurate details.
Also, make sure to remove the trailer’s vent interior trim blocking the edges of the opening when measuring. Next, measure your trim piece and begin the installation.
Get your vent and apply some sealant. Next, press the vent into the cut opening. Keep adjusting till it fits perfectly into the hole. And finally, cover with more sealant.
Meanwhile, if you’re installing the vent with a fan, make sure to first fix your wiring before tucking in the fan.
Step 7: Wiring the teardrop camper trailer
For this, choose a power supply type first. Regardless of which you pick, a DC or an AC, you’ll need a battery, to begin with. Get a battery of choice and the corresponding end of the power wire to make a connection.
Also, get the remaining end and connect it to the fuse panel, ensuring that the charges are balanced.
Once done with the connection, get a 14 gauge black ground wire and work the wiring through to the light bulbs, the galley, and other compartments of the teardrop where you wish to have power.
Step 8: Building the rear door of your teardrop camper trailer
To start building the rear door, you’ll need four rounded pieces of plywood with 3⁄4 inches each and six 2x4s for the work.
Next, place your rounded pieces of plywood where you want the door to be.
Also, get the 2x4s and place them between both sides of the rounded plywood. Add 2x2s to the middle of your rounded pieces of plywood for more support and better structure.
This addition will help clasp the wood in place. Now, build out your door with 1⁄8 inches of hardwood and connect other fixtures.
Step 9: Insulating your DIY teardrop camper trailer
Insulation will require 1 1⁄2 inch thick sheets. Preferably get 4×8 sheets and cut them according to where you want to insulate.
Also, ensure your insulation sheets are waterproof; otherwise, you might need to get a separate waterproof like Blueskin.
Using glue, begin to work your sheets through each area of your camper where you want to insulate.
Step 10: Alterations and modifications
You may want to paint your teardrop trailer to enhance the look for modifications. But If you’re not in a hurry and would like to do that later, you should cover it up with aluminum, pending when you are ready.
Get the aluminum and cut it into sizes fit for your teardrop design. Take each piece and cover the roof, the sides, and any other area you deem important.
Also, you’ll need to protect further openings on the teardrop trailer from water breakage and leaks.
Get a hinge, preferably a hurricane hinge, and install it properly on openings in your teardrop trailer. The hinge will help prevent water from leaking and ruining your teardrop.
You can also add a mounted umbrella stand over the kitchen galley for more modifications. This will help protect against rain while also providing shade on sunny days.
Finally, furnish your teardrop camper trailer and make it bring you the soothing, exciting experience you want.
DIY teardrop trailer cost for a simple 4 by 8 camper trailer
If you want to build your own teardrop trailer, there are a few different options and costs to have in mind. Here’s a basic rundown of what you need to know:
The frame size: The frame’s dimensions will determine the build’s cost and complexity. As previously mentioned, a 4 by 8-foot frame is the cheapest option, costing between $2,000 to $3,000, but it won’t have much storage or sleeping space.
However, this is a great option if you’re on a tight budget. A 6 by 12-foot frame will be more expensive but will offer more room, utility, and storage.
Final Words
Building your own teardrop trailer is pretty easy and comes with many benefits. Not only does it save you money, but it gives you the flexibility to customize to your preference.
Depending on your budget, you can remove or add any features you wish. And more importantly, customized teardrop trailers make your camping experience thrilling and memorable.
We hope you found this “how to build a teardrop trailer” guide super helpful and actionable. Also, do well to share with family and friends who may be interested in DIY teardrop trailers.
Frequently Asked Question
How much does it cost to build a teardrop camper?
Building a teardrop camper will cost between $2,000 to $3,000 if you’re on a tight budget and can go as high as $10,000 to $15,000 if you’re all about teardrop camper trailers with enough utility storage and sleeping space.
However, getting a motorhome can cost anywhere from $10,000 to $40,000 on average and $40,000 to $300,000 based on the style and features of the motorhome.
What kind of plywood do you use for a teardrop trailer?
When building a teardrop trailer, the best plywood is 4×8 pressure-treated plywood. This kind of plywood is highly recommended because of its strong resistance to wear and durability. Also, it’s easier to repair compared to other types of wood.
How long does it take to build a teardrop camper?
Typically, a teardrop camper project takes three months to build. However, if you’re building yours occasionally, particularly on weekends, it can take up to six months.
Do teardrop trailers have bathrooms?
Teardrop trailers have bathrooms. Although, in the past, most teardrop trailers lacked this feature, however, manufacturers are adding them as an essential upgrade since most travelers fancy them.
Are teardrop campers worth it?
Of course, teardrop campers are worth it. Unlike tents that offer limited features and accessories, teardrop campers provide a wide range of exciting features.
The moment it rains, tents become nonfunctional. In contrast, teardrop campers provide shade and shelter against harsh weather. Moreover, they are super cozy, satisfying, and enjoyable.