One of the many benefits of cleaning your RV air conditioner is that it saves you from costly repairs and replacements of AC unit parts. There are other reasons, like the fact that it improves the overall efficiency and purifies the air in your RV air conditioner.
Regular cleaning not only ensures energy efficiency but also extends the unit’s lifespan, and it’s not as complicated as many people make it seem.
In this easy step-by-step guide, I’ll guide you through all the processes involved in RV air conditioner filter cleaning and break them into simple, efficient steps for you to use when cleaning your RV air conditioner to achieve the best results.
Table of Contents
- 1 What is an RV air conditioner?
- 2 Tools Needed to Clean Your RV Air Conditioner
- 3 How to Clean RV Air Conditioner in an Easy Step-by-Step Guide
- 3.1 Step 1: Get the AC unit ready
- 3.2 Step 2: Vacuum-clean the AC Filter
- 3.3 Step 3: Soak and Scrub the AC Filter
- 3.4 Step 4: Spray a vinegar mix to prevent bacteria growth
- 3.5 Step 5: Thoroughly dry your AC filter and put it back in place
- 3.6 Step 6: Clean the evaporator condenser coils using a coil comb
- 3.7 Step 7: Clean the Oil Fan Motor Cap
- 4 The Importance of Cleaning Your RV Air Conditioner
- 5 Conclusion
- 6 Frequently Asked Questions on Cleaning RV Air Conditioner
What is an RV air conditioner?

An RV air conditioner is a specialized cooling system designed for recreational vehicles. Unlike regular air conditioners, RV units are compact, lightweight, and better suited for the unique demands of mobile living.
These systems often incorporate features like ductless designs and adjustable vents to maximize efficiency in the limited space of an RV interior. With the ability to cool or heat, they contribute significantly to the comfort of travelers during diverse weather conditions, ensuring a pleasant environment on the road.
Tools Needed to Clean Your RV Air Conditioner
You’d need some essential cleaning tools for your RV AC cleaning. They are important because they directly contribute to the result you’d get from cleaning your RV air conditioner. Some of these tools include:
- Small Soft-Bristle Brush or toothbrush (alternative option)
- Vinegar Mix
- Soap and Water
- Coil Cleaner
- Coil Comb
- Compressed Air
- SAE 20-weight Oil
How to Clean RV Air Conditioner in an Easy Step-by-Step Guide
With a detailed step-by-step guide, you can quickly clean your RV AC filter without hassle. In this guide, we’ve provided all the information you need to clean your RV AC. Let’s start with getting your AC unit ready for cleaning.
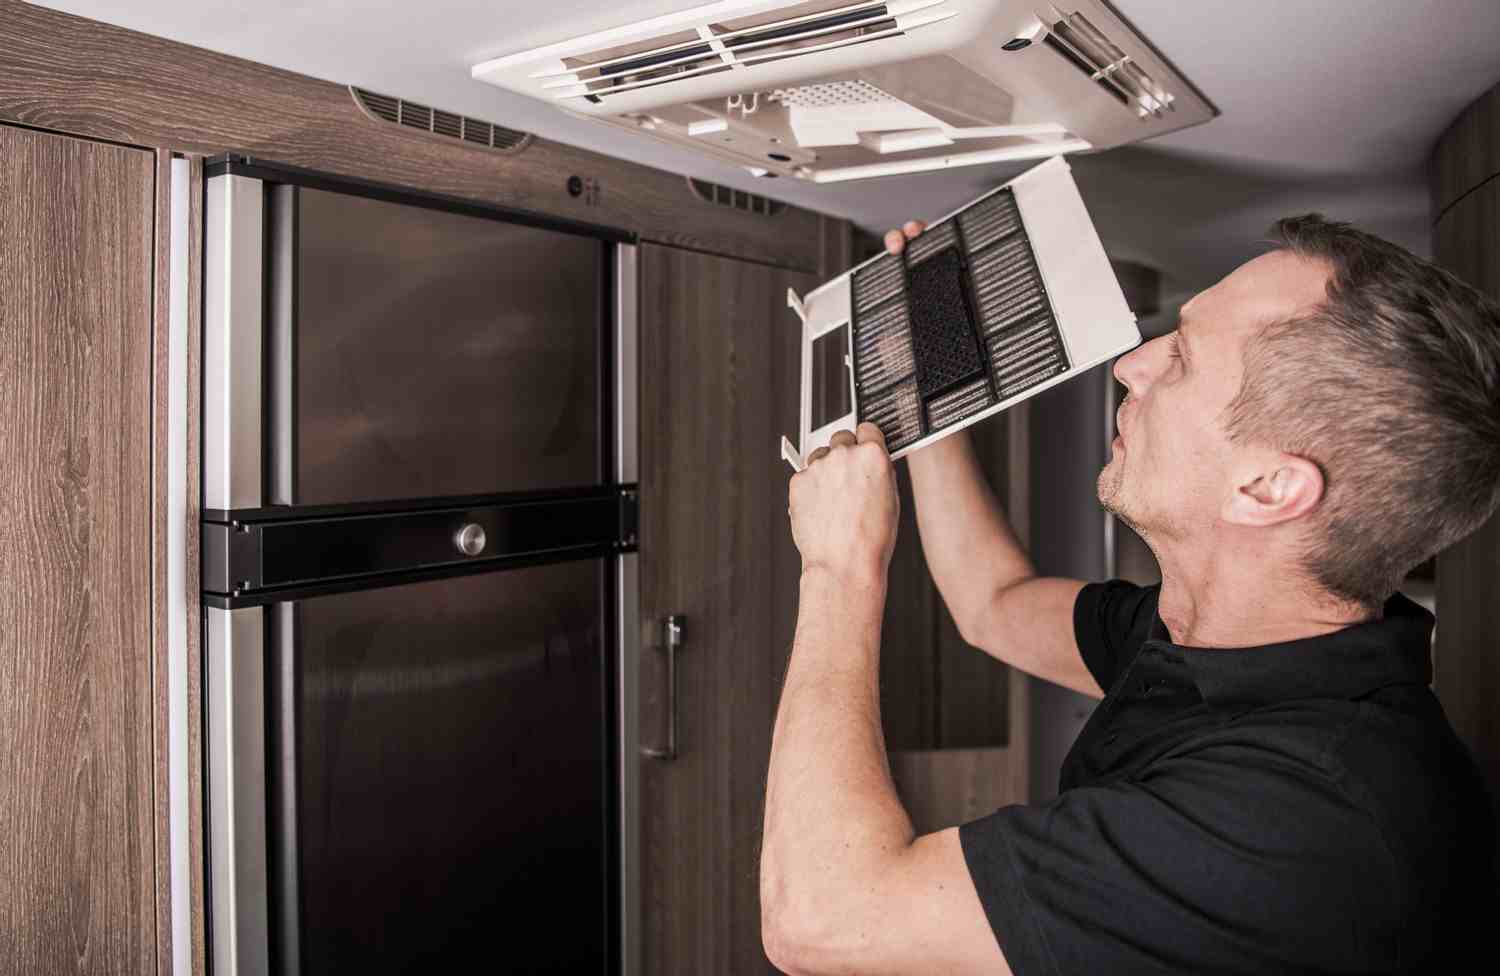
Step 1: Get the AC unit ready
Preparing your RV air conditioner for cleaning is the first step toward ensuring a smooth and effective maintenance process.
To get your AC unit ready for cleaning, turn it off and disconnect it from the power source for safety. Remove any loose debris or dust from the exterior using a soft brush and carefully access the air filter, which is the focus of your cleaning.

Carefully inspect it for any visible dirt or damage. If your filter is washable, follow the manufacturer’s instructions for cleaning the RV filter. For disposable filters, consider replacing them. It’s a start, but this process sets the stage for a thorough cleaning, optimizing the performance of your RV air conditioner.
Step 2: Vacuum-clean the AC Filter
After removing your RV air conditioner filter, it’s time to vacuum clean the dirt buried deep in the AC filter using a vacuum cleaner. Begin by turning off the unit to ensure safety.
Carefully remove the filter and use a vacuum cleaner with a soft brush attachment to gently remove accumulated dust and debris. You should pay extra attention to vacuuming the corners and crevices, as these are usually where dirt quickly accumulates.
Step 3: Soak and Scrub the AC Filter
Vacuum cleaning is often the start, but it takes soaking and scrubbing to complete cleaning your RV AC filter.
- Make a solution using equal measurements of water and vinegar.
- Submerge the filter in this mixture and let it soak for at least an hour. (The acidic properties of vinegar aid in breaking down accumulated dust and debris.)
- After soaking, use a soft-bristle brush or toothbrush to scrub the filter.
Step 4: Spray a vinegar mix to prevent bacteria growth
Using some of the vinegar mix you purchased, spray the AC unit and AC coils to fight off bacteria and give your AC the profound cleaning effect that keeps your air fresh and free of bacteria.
This mixture is a powerful antibacterial agent, effectively eliminating mold and mildew. Spritz the solution generously on the air filter and evaporator coils. The acidic nature of vinegar cleans and helps prevent further bacterial growth.
After spraying, allow the solution to sit for a few minutes before wiping them clean. This contributes to a healthier, more hygienic air quality inside your RV.
Step 5: Thoroughly dry your AC filter and put it back in place
Since we already discussed how to clean your RV AC filter, we should also discuss how to dry them thoroughly and put them back in place for later use.
Damp filters are the leading cause of mold and reduced AC efficiency. After washing or vacuuming, allow the filter to air-dry completely. Take your time here, as there’s no reason to rush it.
Step 6: Clean the evaporator condenser coils using a coil comb
To make your RV AC coil cleaner, gently run the coil comb through the fins and carefully straighten any bent fins for improved airflow. This will enhance the heat exchange, allowing the system to function more efficiently.
Regular coil combing prevents dust and debris buildup, reducing strain on the compressor and promoting a longer lifespan for your RV air conditioner.
Step 7: Clean the Oil Fan Motor Cap
Start cleaning the oil fan motor cap by carefully removing the lid to expose the fan motor. Gently wipe away all accumulated dirt and debris using a soft cloth or a small brush.
For stubborn grime, use a mixture of mild soap and water. When done, make sure the oil cap is adequately dried before reattaching.
The Importance of Cleaning Your RV Air Conditioner

Cleaning your RV air conditioner isn’t just a chore; it’s also a savvy investment that will save you from replacing your RV AC unit and also help you retain the efficiency of your RV AC unit.
Although saving money is enough to get you interested in how you can adequately clean your RV AC, it’s not the only advantage to learning how to maintain your RV air conditioner.
Maintaining your RV air conditioner shields you from the health hazards of inhaling bacteria and unhygienic air within your RV. Other benefits include:
Better Air Quality
Regular cleaning and maintenance of your RV air conditioner significantly improves the air quality inside your vehicle. This is because the process focuses on removing dust, debris, and mold that tend to accumulate within the system.
Cleaning the filters, coils, and ducts ensures that the air you breathe is fresh and free from contaminants, promoting a healthier environment for you and your fellow travelers. Overall, the air purification within your unit provides an added advantage, contributing to a healthier and more comfortable living space on your travels.
Improves Cooling Efficiency
A well-maintained air conditioning unit operates more efficiently. When filters and coils are clean, the system doesn’t have to work as hard to cool the air, reducing energy consumption and potentially extending the lifespan of the unit.
Proper maintenance ensures that your RV’s air conditioner performs at its best, keeping you cool and comfortable during your travels without unexpected breakdowns.
Increases the Lifespan of your RV AC Unit
Regular maintenance is the key to extending the lifespan of your RV’s air conditioner. Components wear out over time, but with proper care, you can significantly slow down this process, and routine cleaning and checks are the best way to prevent premature wear and tear.
Conclusion
In this article, we’ve provided all the step-by-step guides you need to maintain a clean RV air conditioner from a cost-efficient perspective. This means you, like anyone else who reads this article, can easily clean their RV AC unit on a budget.
We’ve also explored the importance of an RV air conditioner. You should know that RV ACs can slightly differ from each other.
So, always consult the manufacturer’s manuals before you start cleaning your RV AC filter. Is there something you think we missed, or do you have some valuable information on RV air conditioners? Please leave your comments below.
Frequently Asked Questions on Cleaning RV Air Conditioner
Why is my RV’s AC not cooling?
Several factors could contribute to your RV’s AC not cooling. Common issues include low refrigerant levels, a dirty or blocked air filter, or a malfunctioning thermostat.
It could also be due to an insufficient power supply, a faulty compressor, or issues with the ductwork. Begin troubleshooting by checking these components, ensuring proper maintenance, and promptly addressing any identified problems for optimal cooling performance.
What can I use to clean my RV AC unit?
Some of the tools you’ll need when cleaning your AC include a small Soft-Bristle Brush or toothbrush (alternative option), Vinegar Mix, soap and water, a Coil Cleaner, a Coil Comb, Compressed Air and SAE 20-weight Oil.
How do you maintain an RV air conditioner?
To maintain an RV air conditioner, you’d need to regularly clean the filter with a soft brush or toothbrush, vinegar mix, soap, and water to remove dirt.
You should also keep the fan motor cap debris-free and lubricate it with SAE 20-weight oil. Also, periodically use compressed air to clear dust.
What can I use to clean my RV AC coils?
For effective cleaning of your RV AC coils, consider using a specialized coil cleaner. This product is designed to dissolve dirt, grime, and debris accumulating on the coils, ensuring optimal heat exchange and overall system efficiency.
Be sure to follow the manufacturer’s instructions for the specific coil cleaner you choose to achieve the best results and prolong the life of your RV air conditioner.
How often should you clean or change your RV AC filter?
You can clean or change your RV AC filter every 1 to 3 months, depending on usage and environmental conditions.
However, regular maintenance ensures optimal airflow, energy efficiency, and air quality in your RV. It would help if you kept an eye on the filter’s condition and did not delay replacements or cleanings when needed.