Installing solar panels on an RV enhances your camping experience. Unlike generators, solar panels are noiseless and barely need maintenance or replacement for several years. Before mounting solar panels on an RV, choose between standard or flexible solar panel placements to get the most out of the sun.
Then, create a position for the solar panels on your RV roof and connect mounting brackets to each panel. After that, identify the spots where you need to drill holes in your RV roof. Drill the hole and screw in your mounting brackets.
Using butyl tape, line the bottom edges of each panel and connect the panels to the roof. Then, apply a generous amount of Dicor sealant, and your solar system is ready.
In this article, I’ll walk you through the step-by-step process of mounting solar panels on your RV, including what you need for RV solar panel installations and the required materials for wiring.
Table of Contents
- 1 Installing Solar Panels on an RV
- 2 What You Need for Installing Solar Panels on RV
- 3 How to Install Solar Panels on RV in 7 Easy Step-By-Step Guide
- 3.1 Step 1: Create a Position for the Solar Panels on your RV Roof
- 3.2 Step 2: Connect Mounting Brackets to Each Solar Panel and Set them Aside
- 3.3 Step 3: Identify the Spots Where you Need to Drill Holes in your RV Roof
- 3.4 Step 4: Drill a Pilot Hole in Your RV Roof and Screw Your Mounting Brackets
- 3.5 Step 5: Using Butyl Tape, Line the Bottom Edges of Each Panel
- 3.6 Step 6: Use the Screws from the Mounting Kit to Connect the Panels to the Roof
- 3.7 Step 7: Apply a Good Amount of Dicor Sealant
- 4 Attaching Solar Panels to RV Roof Without Drilling
- 5 RV Solar Panel Wiring Diagram
- 6 Materials Needed for Wiring Your Solar Panel into Your RV
- 7 How to Wire the Solar Panels into Your RV
- 8 Parallel Wiring vs. Series vs. Parallel Series
- 9 Final Words
- 10 FAQs on How to Install RV Solar Panel
Installing Solar Panels on an RV

Before installing solar panels on an RV, you should first know how and where you want to mount your panels. Drilling holes into your RV’s roof is critical, so endeavor to get it right on the first try.
Take note that all RV roofs aren’t the same. Also, the solar panel arrangement that worked for others may not work for you. However, you may not have to worry about hole drilling if you’re using a flexible solar panel.
Still, planning for the best positions to place your panels for durability and efficiency is necessary.
Pro Tip
Before purchasing your solar panels, ensure to take detailed measurements of your RV roof. Take note of all AC units, vents, and any other items on your roof that could obstruct your RV solar panel installation. For best results, draw a diagram of your entire roof with the measurements and positioning of the panels.
What You Need for Installing Solar Panels on RV
Once you’ve decided on the perfect positions for your RV solar panel mounting, the next step is to get the right supplies and tools to properly secure the panels to the RV roof.
Here’s a list of some of the tools you need:
- Cordless Drill
- Mounting Z Brackets (required: 1 set for each panel)
- Butyl Tape
- Dicor Self-Leveling Lap Sealant
How to Install Solar Panels on RV in 7 Easy Step-By-Step Guide
Installing solar panels on an RV will be seamless if you follow these seven easy steps.
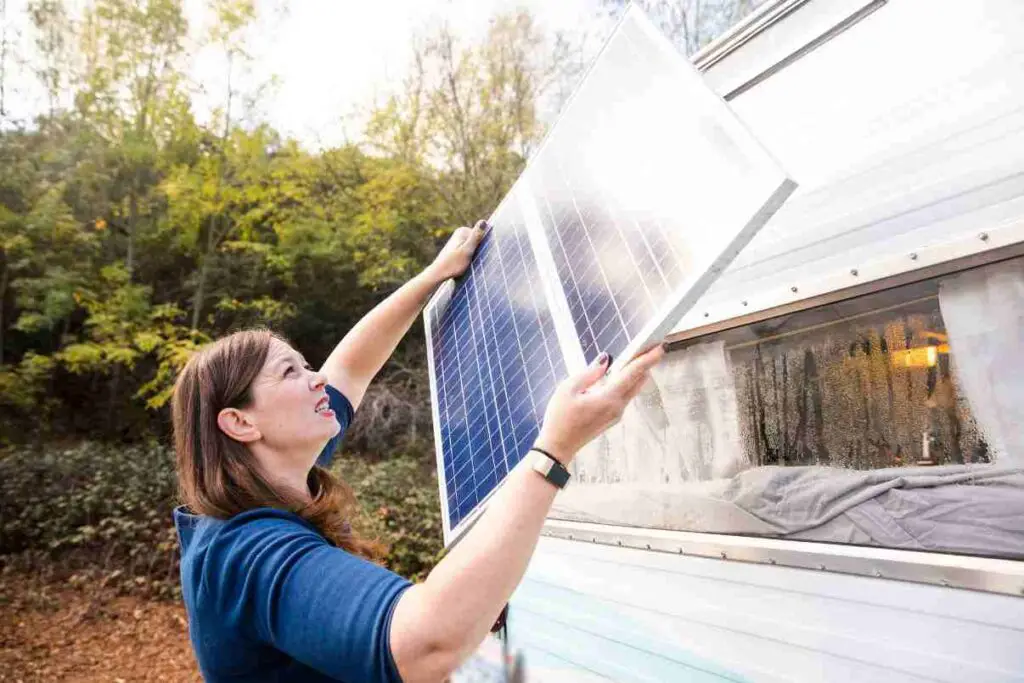
Step 1: Create a Position for the Solar Panels on your RV Roof
Before proceeding with your RV solar panel installation, create a better position for the solar panels on your roof. Double-check if the panels properly fit in the position before drilling holes into your roof.
Keep in mind that the process will differ based on the type of solar panel you have. For instance, rigid panels must be attached to the RV roof using screws. Flexible panels are mounted with adhesive, although they can also be mounted with screws.
It’s worth noting that the material used in building the upper layer of your roof will determine the type of adhesive needed. As a result, many RV solar panel kits don’t come with adhesive. Rather, they only come with the mounting hardware.
Pro Tip
Ensure the panels are mounted in a position where air conditioning and vents won’t shade them.
Step 2: Connect Mounting Brackets to Each Solar Panel and Set them Aside
The next step is to attach mounting brackets to each solar panel. As earlier mentioned, the RV solar panel mounting process may differ depending on the panel type.
However, you must install rigid panels with screws by drilling into your roof. They can be fixed tilt-mounted or affixed flat to your RV roof.
Step 3: Identify the Spots Where you Need to Drill Holes in your RV Roof
Identifying the spots where you need to drill holes on your RV roof applies when installing rigid solar panels with a fixed mount. In such a case, you must bolt the brackets tightly based on your panel’s positioning.
Then, apply sealant underneath the brackets to keep the seal airtight and prevent potential roof leakages. However, you don’t have to drill holes if the panels have flexible designs. Such designs can be mounted with adhesive attached directly to the roof surface.
In addition, removable types, like EcoFlow Portable Solar Panels, have a foldable design and portable carry case. They’re easy to set up and require no installation.
Step 4: Drill a Pilot Hole in Your RV Roof and Screw Your Mounting Brackets
Position your solar panels and mark where you need to drill holes. Then, drill small pilot holes into your RV roof where your brackets will be screwed down. Ensure the holes will hit studs in your RV so your panels are secure.
Then, fill the holes with a small quantity of the Dicor sealant to help ensure that everything remains watertight. Although all RVs are different, the studs are usually visible with a 2-3-inch-wide gray line that goes width-wise off the roof.
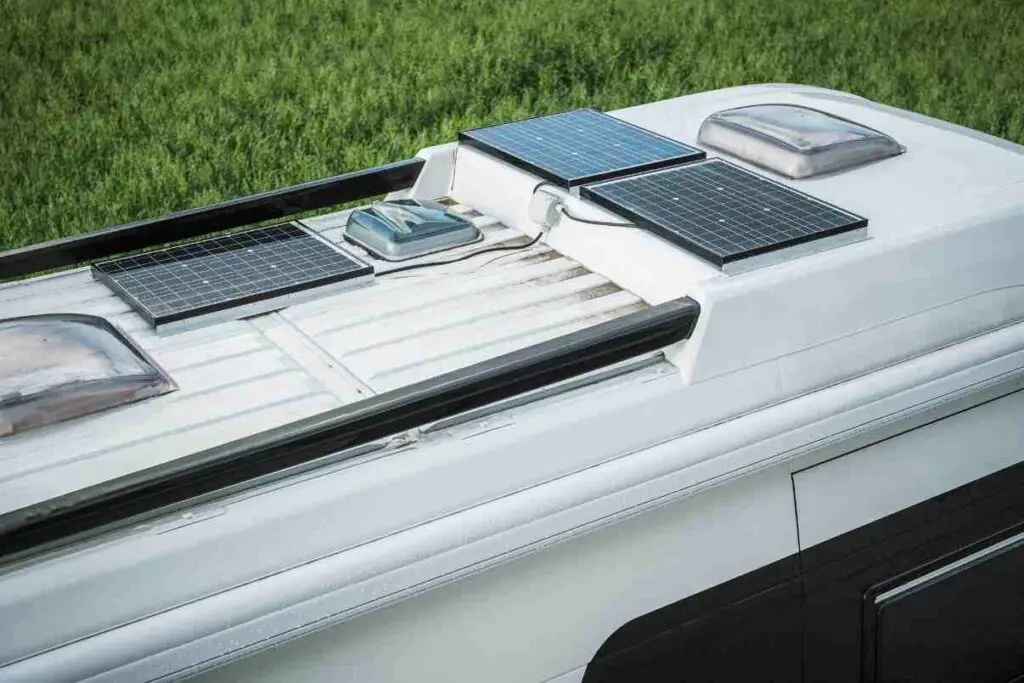
Step 5: Using Butyl Tape, Line the Bottom Edges of Each Panel
Line the bottom edges of each solar panel with butyl tape and arrange the panels in place. Covering the panels with butyl tape helps add security to your panels and prevents them from flying off.
Step 6: Use the Screws from the Mounting Kit to Connect the Panels to the Roof
Attach the solar panels to your RV roof using the screws from the mounting kit. Ensure that the panels are properly placed in their mapped-out positions.
Step 7: Apply a Good Amount of Dicor Sealant
Apply a generous amount of Dicor sealant around and on top of the mounting brackets to seal everything off. Make sure to apply the adhesive directly to the butt joint in the roof surface and around the mounting brackets to seal them off from sun rays.
Attaching Solar Panels to RV Roof Without Drilling

After deciding the type of solar panel you’d love to use, it’s necessary to consider mounting it. Depending on your chosen type, there are different methods of attaching solar panels to an RV roof without drilling.
Portable RV Solar Panels
Portable RV solar panels are great at harnessing the energy of the sun. They’re great alternatives to traditional installations for RVers willing to undertake a DIY project. These panels require a simple setup and are ready to use.
The two most common portable RV solar panels are foldable and suitcase solar panels. Foldable solar panels have more than two panels and fold up in an accordion style. To set up this solar panel, all you need to do is attach the clamps to the battery terminals, and you’re good to go.
On the other hand, the suitcase solar panels come in a folding set of two 50-watt panels. An adjustable kickstand allows it to stand upright or at the desired angle. To set up this panel, attach the alligator clamps to your RV battery’s negative and positive terminals and connect the panels to the attached solar charge controller.
RV Solar Panel Corner Brackets
One of the most effective methods for mounting solar panels to your RV roof without drilling is using corner brackets. These brackets are made of ABS plastic. They’re usually attached to the four corners of the solar panels and adhered to the RV roof using silicone glue.
Corner brackets are only for aluminum-framed, rigid solar panels. They don’t work with flexible panels. To install these brackets, you’ll need to place them on all spots on the panel, mark holes, and drill them through each marked area.
Then, fasten the brackets to the solar panel using the provided bolts and nuts. Apply silicone adhesive, preferably Sikaflex 252, to the underside of the brackets and place it in the desired roof’s position.
VHB Tape
VHB tape is a lightweight, affordable option for mounting solar panels without drilling. It’s an extremely strong double-sided tape that can be applied quickly and easily to solar panels.
Despite its ease of use, VHB isn’t strong enough to adhere rigid solar panels to an RV roof. Hence, it is strictly used on flexible solar panels only. To apply VHB tape, remove the plastic layer from one side of the tape and stick it to the solar panel’s bottom edges.
Then, remove the plastic layer from the other side of the tape and firmly press the solar panel onto the desired roof location. When applying this tape, ensure that the area is dust-free and isn’t too cold outside.
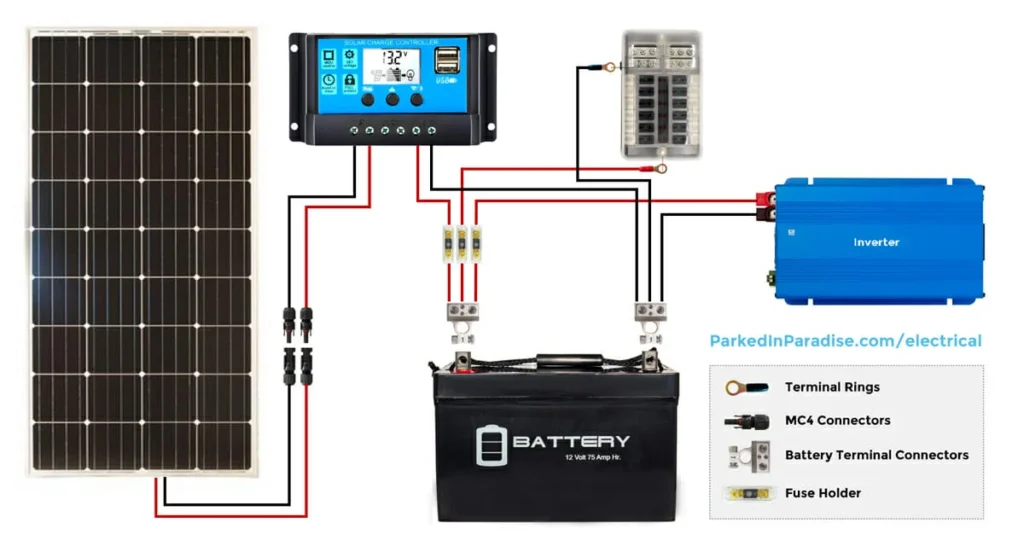
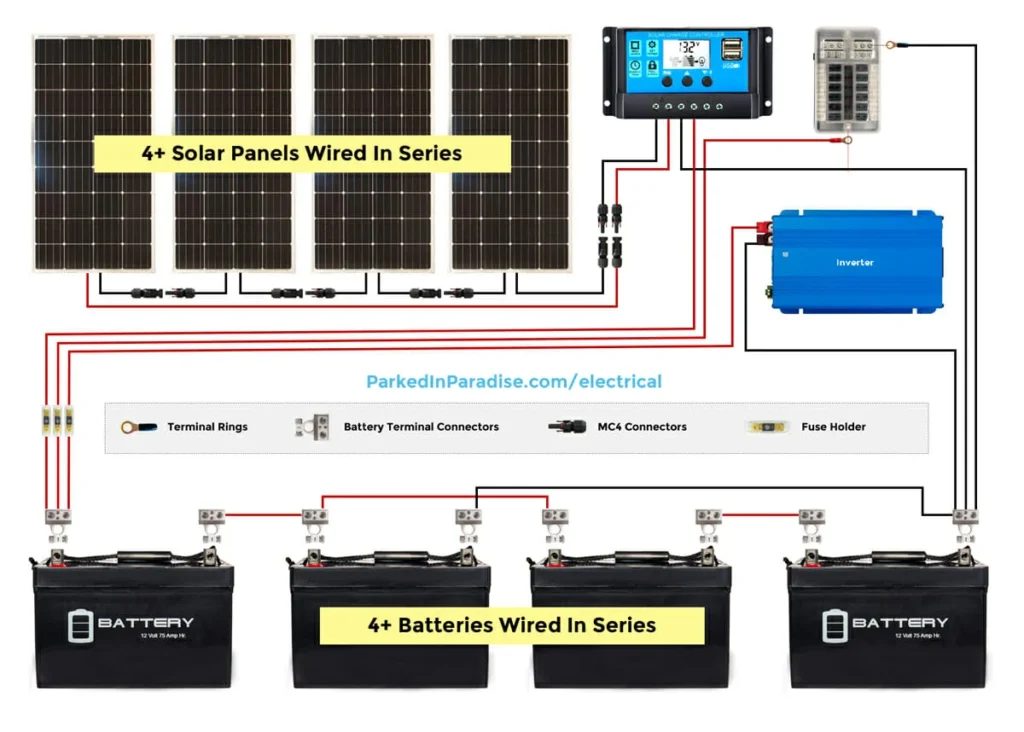
RV Solar Panel Wiring Diagram
After sizing your RV system and the panels, the bulk of work starts! Below are different RV solar panel wiring diagrams. Each diagram illustrates how to connect the solar panels, battery bank, and charge controller.
100W RV Solar wiring diagram
A 100-watt solar system powers small items like a roof vent, LED lights, and a cell phone. It’s more suitable for camper vans but is great at providing supplementary energy on the go.

However, the amount of power a 100-watt solar panel can provide depends on factors like the weather, location, type of charge controller you install, and time of year. A 100-watt solar panel provides about 30-32 amp hours per day.
200W RV Solar wiring diagram

A 200W RV solar panel system is enough to power small 12V appliances, like a sink pump, a cell phone signal booster, and a laptop. It’s less likely to power a portable refrigerator full-time. So, it’s a good setup for supplementary power.
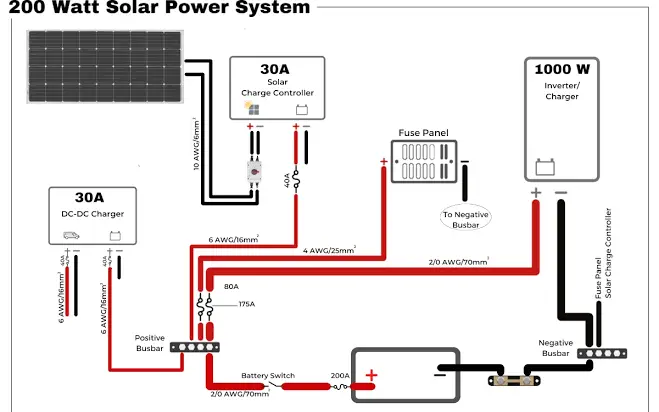
This RV solar panel is relatively small and has an easy setup. Unless you’re considering wild camping in your RV, this panel gives you reliable access to shore power.
Besides, it can run a small, energy-efficient fridge, making it a good option for small campers. However, if your ideal solar system is larger than 2200 watts, build the system with scalability in mind.
300W RV Solar wiring diagram
A 300-watt solar system can support the energy demands of a couple or even a small family in a medium-sized motorhome. Careful use and monitoring can take up to a year without needing other energy sources like hookups or driving.
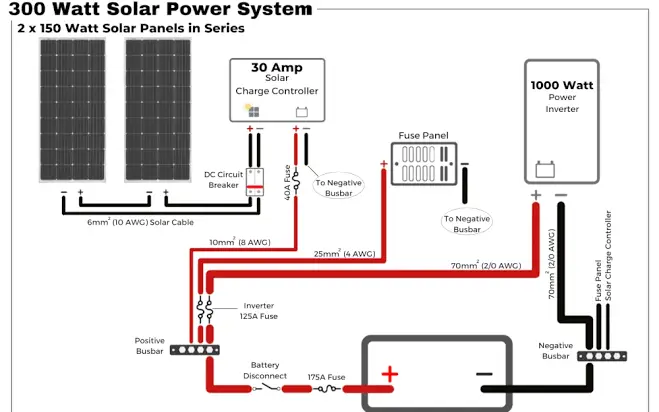
This panel provides approximately 90 to 96 amp hours daily. Since you may be unable to recharge the batteries daily, consider having an alternative (as a contingency) to avoid cycling the batteries more than necessary.
Overall, 300-watt panel systems reserve a day or two, depending on your usage.
400W RV Solar wiring diagram

A 400-watt solar panel system gives you a couple of days in reserve, depending on your usage, without other sources of recharging. It’s enough to run your roof vent during the day and night to stop condensation.
In addition, it can recharge small devices on a USB, like tablets, kindles, and phones.
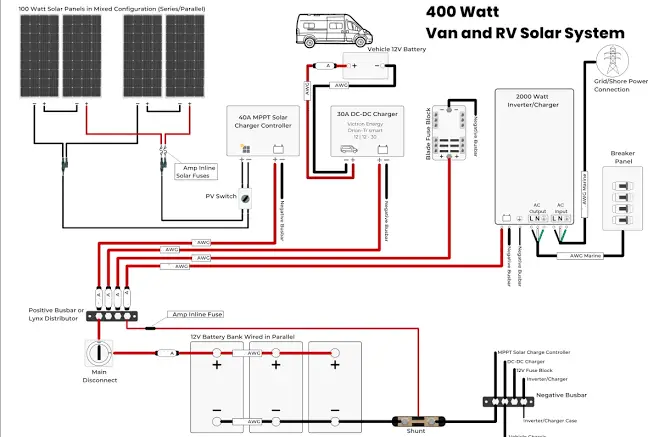
How much 400 watts of solar panels can power depends on the time of year, the location, the type of charge controller, and the weather. However, they’re capable of providing 120 to 128 amps daily.
Large RV solar wiring diagrams (400W or more)
800 watts of solar power is enough for even the largest RVs and campervans. Large RV solar panels provide about 200 to 256 amp hours daily.
They’re enough to run a large fridge, an inverter for a TV, a coffee maker, and charge laptops. If you plan to live in a camper during the winter, the 800W is a full-service luxury.
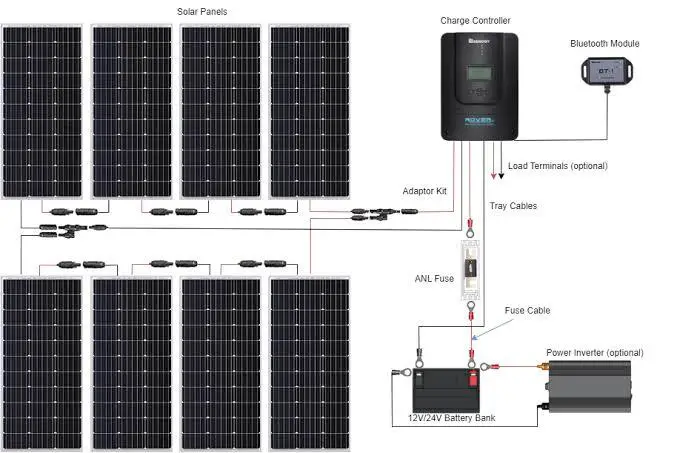
With large RV solar panel systems, there’s no need for driving or shore power. Although you’ll always need to monitor the battery levels and usage with a solar system this size, you’ll comfortably have enough energy to meet the needs of four people.
Materials Needed for Wiring Your Solar Panel into Your RV
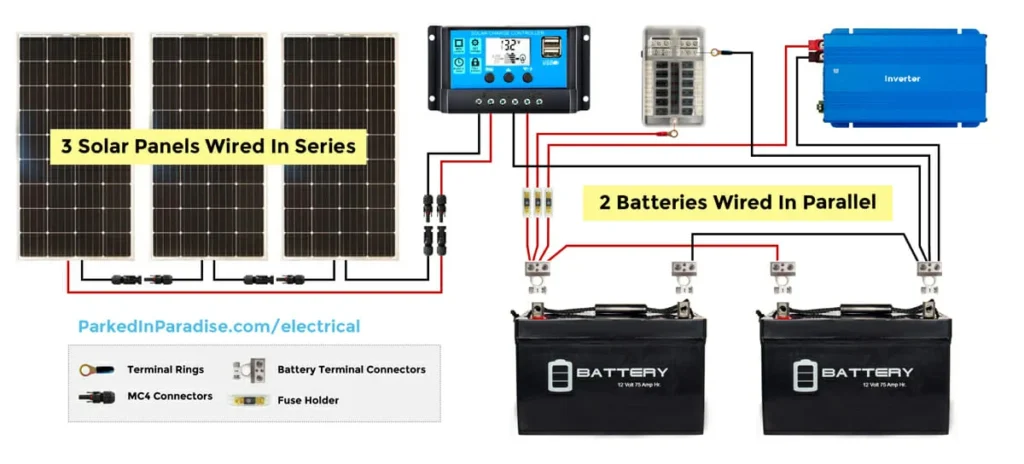
When wiring your solar panel, there are certain materials you must have in place. Some are batteries, mounting brackets, connectors, solar panels, cables, and an inverter.
All the necessary materials must be available, whether you’re wiring your solar panels in parallel or series. While there are numerous inverters, 300W, 600W, 1000W, and 1500W are the most common for solar panels between 100W and over 400W.
The most commonly used alternator chargers are B2B chargers and battery isolators. Wires and fuses are additional parts for all solar systems. In all, before choosing a solar panel system for your RV, make sure to research all its specifications.
How to Wire the Solar Panels into Your RV
After mounting solar panels on your RV roof, the next procedure is to start wiring them. Below are the actual steps for wiring the solar panels into your RV:
- Mount the RV solar panels to the roof using the parallel or series method.
- Attach the charge controller to the RV’s interior near the battery bank.
- Run wires from the solar panels to the charge controller with a circuit breaker or fuse.
- Connect the charge controller to the battery bank
- Then, connect the solar panels.
- Caulk and seal any holes or exposures created during the installation process. If using an inverter, it should be mounted very close to the battery bank.
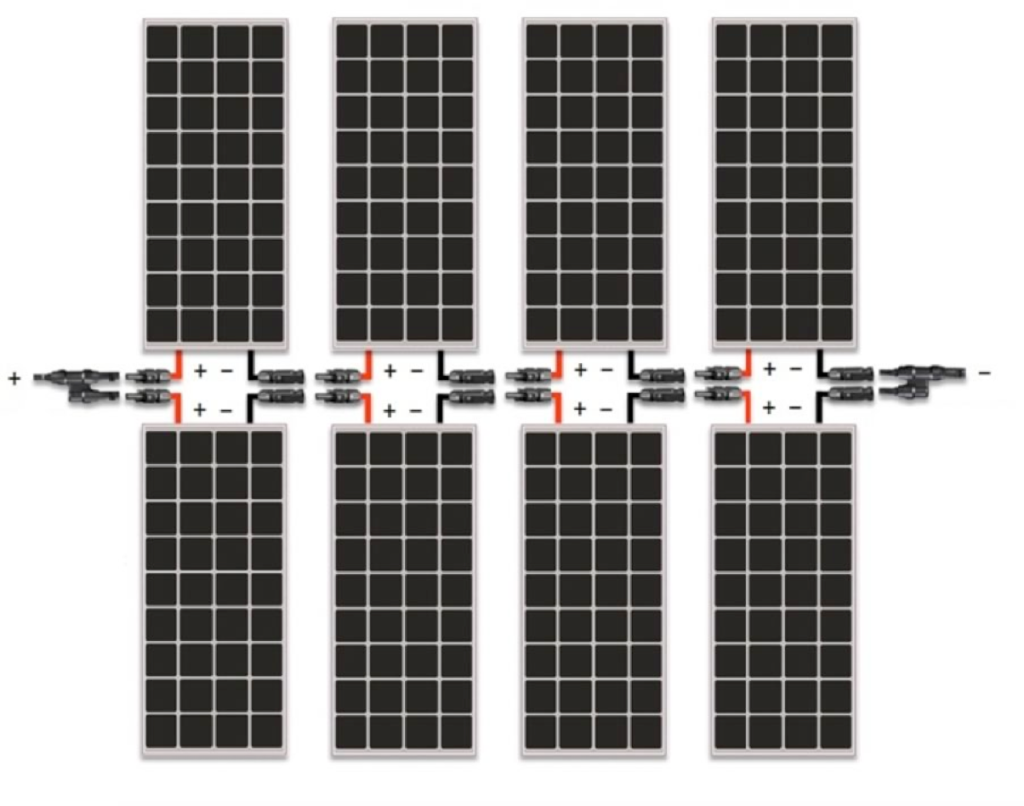
Parallel Wiring vs. Series vs. Parallel Series
In series wiring connections, the negative cable of one panel goes to the positive of the second one, the negative of the second goes to the positive of the third, and so on. Then, the two unused cables from the first and last panels go into the charge controller.
Wiring in series means the panel’s amperage remains unchanged, but their voltages are combined. The negative and positive cables often go into a combiner box for parallel wiring connections. One thick positive cable and a negative cable go into the charge controller.
Sometimes, the MC4 branch connectors are used instead of a combiner box. Parallel wiring means the panels’ voltage remains, but their amperages are combined. The series-parallel connection is usually used with numerous panels.
It’s a combination of the two other wiring methods, which allows you to adjust the amps and voltage of your solar array to the properties of your charge controller. For instance, you can create two strings of panels with high voltage but wire them in parallel to combine their amperages.
Wiring your RV Solar Panels in Parallel

Wiring RV solar panels in parallel is when the positive and negative (+ and -) wires are grouped. This type of wiring allows each panel to operate on its own.
Solar panels wired in parallel require higher-gauge wiring because the amperage is the wire gauge’s limit.
Pro Tip
Don’t wire your solar panels in parallel for units of over 500 watts because you’ll need to buy expensive, thick wires to make the connection efficient.
Wiring your RV Solar Panels in Series

The lowest-performing panel in series wiring connections sets a limit on the output. All other panels will be removed if one panel is in the shade.
Connecting your solar panels in series doubles the voltage going through the wires while leaving the amperage unchanged.
Pro Tip
Use an efficient charge controller. Voltage is the reason why charge controllers have a limit. Hence, RV solar panels wired in series require a more expensive charge controller.
Wiring your RV Solar Panels in Series-Parallel
Wiring RV solar panels in series-parallel means that you have multiple series that you’re wiring in parallel. For example, if you have four solar panels, you could have two sets of two panels.
While one series might be wiped out due to a panel in the shade, the other can still perform at maximum capacity.
You double your voltage and amperage rather than quadruple for a four-panel array wired in series parallel. This allows you to limit the gauge of your wires and the size of your charge controller.
Final Words
The biggest determinants of a solar panel RV installation are your budget and power demands. Although you may consider hiring a professional to take care of the installation, it can also be a seamless DIY project. All you need to do is follow the steps in this article and rest assured of a perfect RV solar panel mounting and a better off-road experience.
If you’re using a flexible panel, you can use adhesive to fix the panels. Run the wiring through a conduit to a cable entry plate and connect it to a charge controller. The installation and wiring materials are affordable and easy to access.
Once your solar panel system is installed, maintain and inspect it regularly to ensure optimal performance. Neglecting routine maintenance can lead to reduced efficiency and potential issues.
Although an RV solar installation can cost about $500 to $2,000, the investment is worth it. So, get started with your RV solar panel installation already. Do you have any questions or suggestions on installing solar panels on an RV? Let us know your thoughts in the comment section!
FAQs on How to Install RV Solar Panel
How do RV solar panels work?
RV solar panels convert solar energy into direct current electricity (12V DC), which charges the RV’s batteries and stores the electricity. Passing the 12V DC through an inverter converts it into 120-Volt AC (alternating current), which powers 120-Volt gadgets like a coffee maker. In short, with solar panels, you can power almost anything.
How many solar panels does it take to power an RV?
Five solar panels are enough to power an RV if your total power consumption is 10,000 Wh. However, the number of panels largely depends on your power consumption needs and environmental conditions.
Can I connect the solar panel directly to the RV battery?
Yes, you can, but it’s not advisable. Connecting the solar panel directly to the RV battery can cause explosions and overheating. Instead, connect it to a charge controller. It’ll help guard the battery against overcharging and improve its lifespan.
How many batteries do I need for my RV solar system?
1 to 4 batteries are enough for your RV solar system. Generally, every 100 amp hours of battery storage capacity is enough for a 300-watt solar panel system. So, if you have two 12V or any combination of batteries that sum up to 200 amp hours, your solar panel output shouldn’t be less than 600 watts.
Do you need an inverter for RV solar panels?
Yes, you do. Residential solar panel setups run on DC, so your RV solar system needs an inverter to convert the DC to AC energy. If you’re using solar panels to power your RV, the energy they collect must first go through an inverter before you can use it.